


 copy")

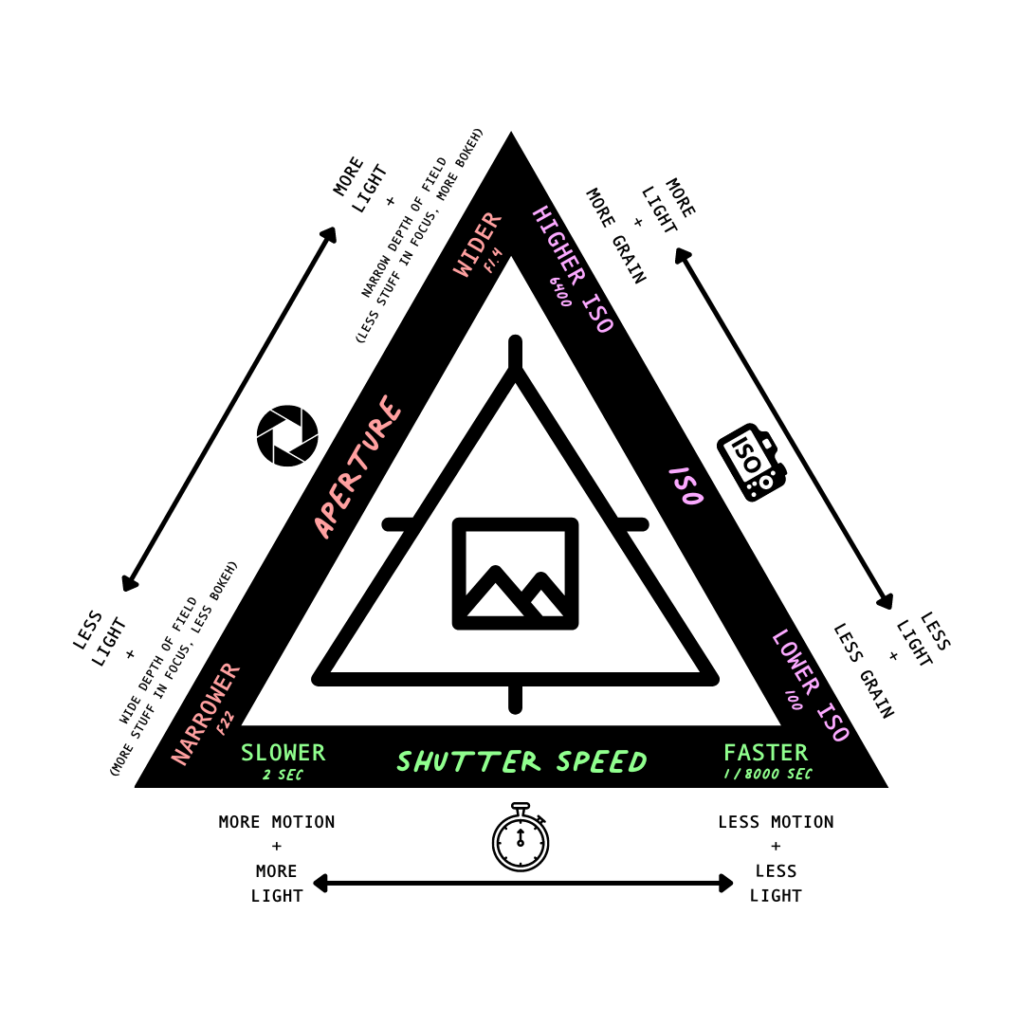
In photography, the “Exposure Triangle” refers to the relationship between shutter speed, ISO, and aperture. It can be confusing, especially if you’re just starting out in photography!
There are plenty of very technical, physics-based, detailed articles out there about the Exposure Triangle. This guide is not that. 🙂 I would prefer you understand the concepts, rather than the math. Here I keep it simple with only the most essential things you need to know to understand the Exposure Triangle, so that you can start applying what you learn in your next photography session.
Overview
You’re working between 3 factors: ISO, aperture (also referred to as f-stop), and shutter speed. These three things regulate the exposure of your image (how light your image is). Shutter speed and aperture both control the amount of light that enters the camera, while ISO refers to the sensitivity of the camera’s sensor. If you are using Manual mode and you change one of these controls, it’s going to change the amount of light in your photograph in most cases, unless you compensate by changing one (or both) of the other two. Each of these factors also has some side effects that are unique to them, which we will discuss in a bit. Think of the Exposure Triangle as a game you play where you need to decide first, how much light you need, and second, which of the side effects work best for the exact situation you are in.
Take a look at the graphic below now, and come back to it once you have finished reading this article (if this kind of thing helps you).
Shutter Speed
the time for which the camera’s shutter is open at a given setting
The camera’s shutter opens and closes to allow light to hit the sensor. Shutter speed refers to how long the shutter is open within the camera.
Shutter speed can be long, like 25 or 30 seconds, which is what a “long exposure” refers to. This means the camera is taking in light for that whole duration. A long shutter speed would be for astrophotography, really dark situations, or if you want to capture motion for something more artistic. But it has to be relatively dark, because if you had the shutter open for that long in a bright area during the day, the photo would probably come out completely white because it was totally overexposed.
If you use a really short shutter speed, like 1/8000 or 1/4000 of a second, that would let in a very limited amount of light. You would use this in a very bright scenario, or if you wanted to capture something in motion without blur (sports, wildlife). When the shutter is only open for that small amount of time, the other settings on the camera have to compensate for it.
Short/fast shutter speed = less light, sharper images for moving subjects
Long/slow shutter speed = more light, blurry subject if they are moving (and any movement of your camera itself!)
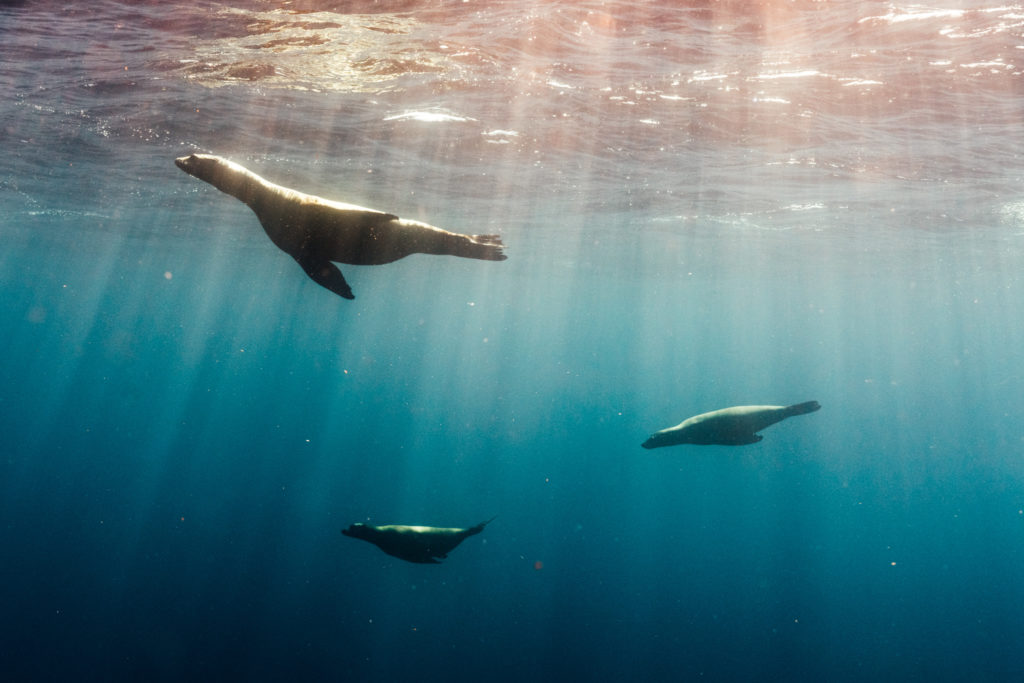
For example, if I am photographing sea lions underwater, I don’t want to go slower than a 1/400sec shutter speed. This is because they are moving, and I don’t want my subjects to be blurry due the motion. But, underwater is not a bright environment! So since I can’t lower my shutter speed, I will need to adjust my aperture and/or ISO in order to add more light to my photograph.
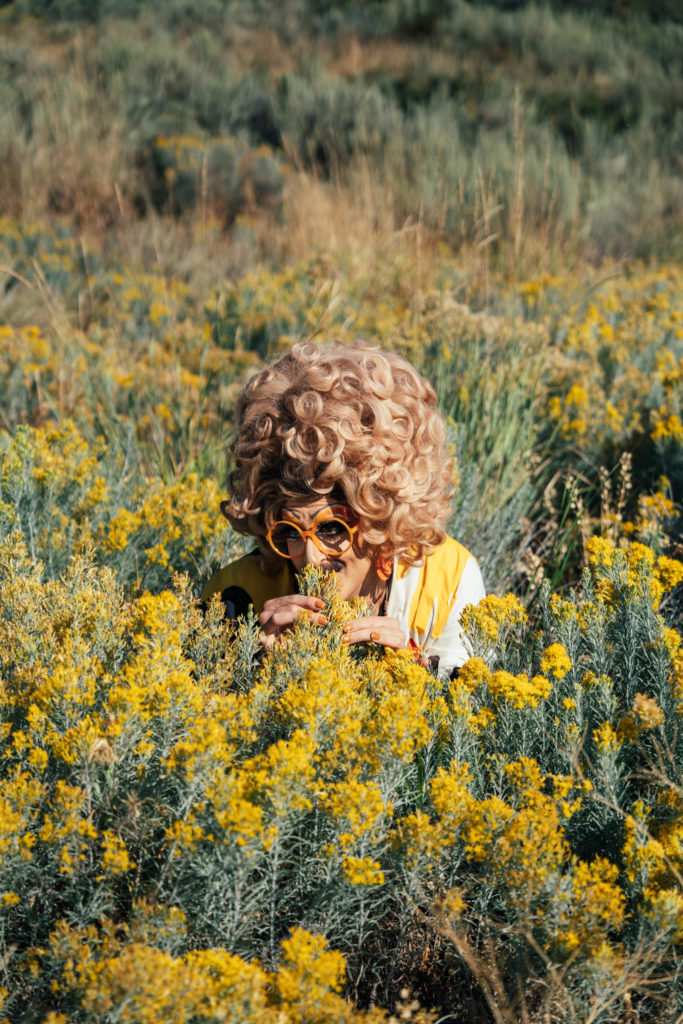
Check out the captions on the photos in this article to see what my camera settings were.
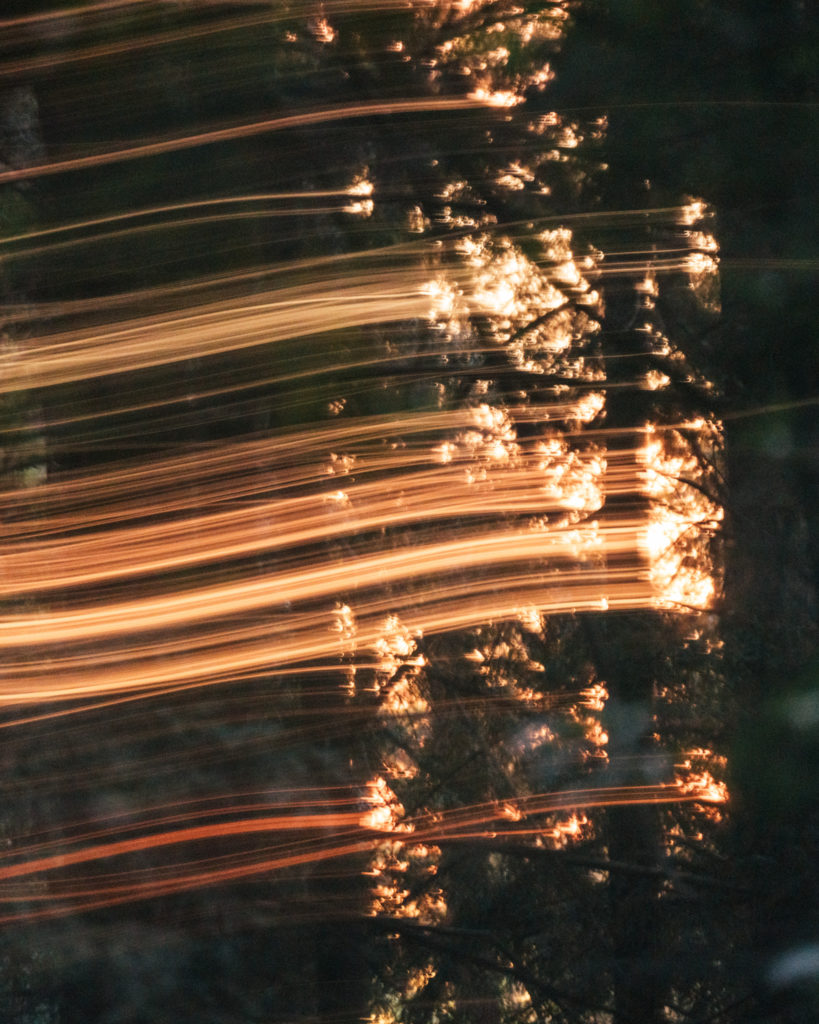
There are also creative ways to work with shutter speed. Below, I used longer shutter speeds and moved my camera while the shutter was open, effectively painting with the light that was peeking through the trees in the forest.
F Stop/ Aperture
a space through which light passes in an optical or photographic instrument
Aperture is the size of the opening within the lens. Think of this like the pupil in your eye– it can open or close to let in more or less light.
Have you ever seen a cat’s eye in a really dark room? The pupil is dilated to allow in more light. That’s like aperture. It’s the pupil of the camera opening to let more light in. When you look at a really bright sky, the pupil in your eye gets really small, it’s the same with the camera, except that you can adjust it manually.
The part that is a little confusing is that the smaller F-numbers (like F2.8) refer to the wider openings, and the bigger F-numbers (like F22) are the smaller openings that don’t let in as much light.
Lenses commonly go as wide as F2.8 or F4. For example, if you have a 24-70mm F2.8, it’s because it goes down to F2.8. Or if it says F1.4, it’s an even wider lens. Lenses like this are great for astrophotography.
The other thing aperture controls is the depth of field. Wider apertures create a narrower depth of field (less area in focus). For example, if you created a portrait at F2.8 with your focus point on eyes, it is possible that the tip of the nose would be out of focus. This is because it falls out of the plane of focus. You would need to bring your aperture up a bit to increase that area of focus.
If you look at a photo and it has a really blurred out background, that’s called bokeh. You will notice this at lower F-numbers (wider apertures).
For landscapes, F8 is a commonly used aperture because it allows for a lot of things to be in focus, while still letting in light.

In cases where you want everything in the frame to be in focus, you will need to use a smaller aperture like F20, and probably a tripod. (You could also do some “focus stacking” in post where you combine multiple images, but we’re not getting into that here.)
Depth of field in an image is a strategic choice from an exposure standpoint, but also a stylistic one. I typically like to shoot at wider apertures, as I like the sharpness they offer, as well as the bokeh in my composition.
My advice? Experiment to see first what you need in terms of light, and then what you like in terms of style. I often use Aperture Priority mode, which allows you to choose the aperture, while the camera automatically adjusts the shutter speed to compensate. This can be a great way to better understand both aperture and shutter speed, and their relationship. Of course, you have to keep an eye on the shutter speed to make sure it doesn’t drop too low, or that it’s not being overwhelmed by the amount of light.
ISO
International Organization of Standards– refers to your camera’s sensitivity to light as it pertains to either film or a digital sensor
If you shoot film, you have seen the numbers on film stock (Portra 400, Ilford 160, etc.). Those numbers indicate the sensitivity of the film. Same thing here. ISO is the speed standard for digital camera sensors.
Higher ISO number = more sensor sensitivity = more light.
So why wouldn’t we just use a high ISO all the time so we didn’t need to mess with our other settings?
Using a higher ISO impacts the quality of the image– it adds noise. The higher the ISO, the more noise in your image. So in general, you want to use the lowest ISO you can get away with.
So when should you increase your ISO? When you can’t decrease shutter speed or go to a wider aperture (and as long as you are OK with the noise).
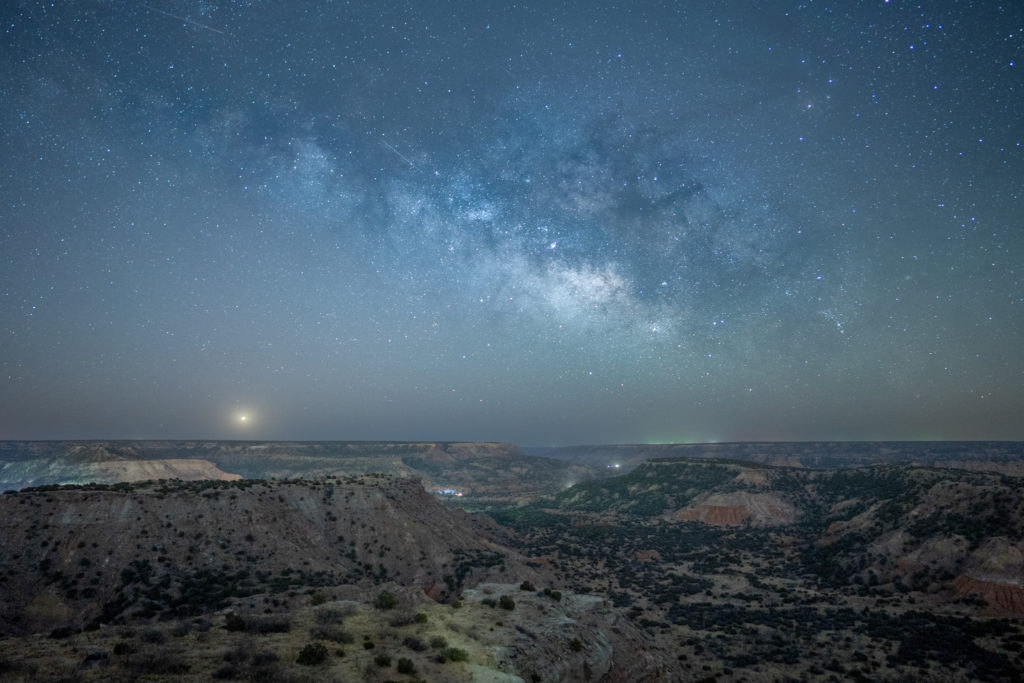
One obvious example is astrophotography. When you are photographing stars, you are using a tripod so that you can work with longer shutter speeds without camera shake. For this image, I was using the lens’ widest aperture of F1.4, and I had the shutter speed at 15 seconds. I could have increased the shutter speed, but if I did, I would have gotten star trails (the camera would have captured the movement of the earth), so I wanted to keep it at 15 sec. I brought my ISO up to 2,500 to create this image.
Say you are photographing dragonflies. You’re at F8 and you need your shutter speed fast at 1/1600 of a second because they are flying around. You don’t want to widen your aperture because the depth of field would be too narrow, and you can’t slow down the shutter speed because you’ll get motion blur. This is a situation where you would increase the ISO– probably to somewhere between 3,200 and 5,000 depending on the light.
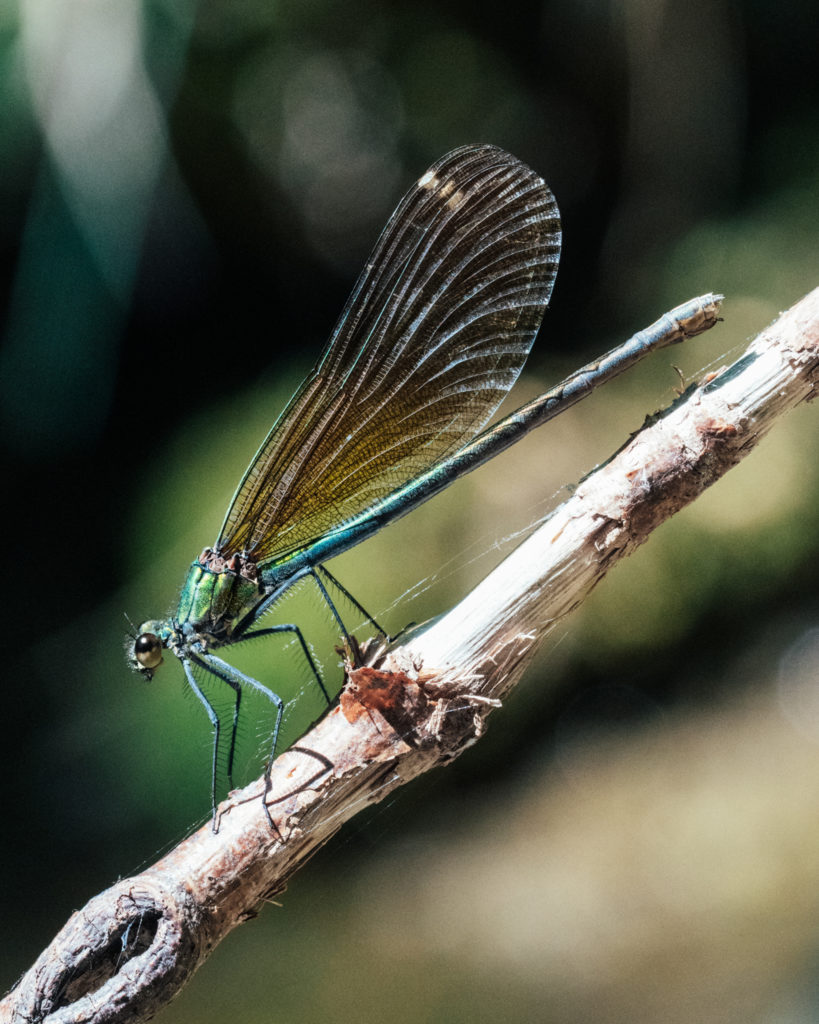
In this photograph, the damselfly is still, so in theory I could have dropped the shutter speed a bit. But you’re not always fast enough for that (I wasn’t)!
Final Thoughts
Remember that your settings are not just strategic, they are also stylistic choices! As you get more comfortable with what each part of the Exposure Triangle does, you will naturally develop your own preferences for your photography.
I recommend taking out your camera now wherever you are, putting it on manual mode, and seeing how each of these factors (shutter speed, aperture, ISO) change the image in your viewfinder. Slow down and really ask, what is happening here when I change the aperture? What is happening when I change the ISO? What happens when I change the shutter speed? Understanding these concepts will help you to better express yourself creatively, because instead of focusing all of your attention on the technical aspect of photography, you’ll be able to do that naturally during your creative process.
I hope this helps give you a good foundation for understanding the Exposure Triangle in photography. Have fun, keep experimenting, and stay open to new ideas!
Please ignore this text box - Recoleta Font


+ show Comments
- Hide Comments
add a comment